
![]()
Pickled peppers
In a perfect world, there would be a jar of pickled peppers on every table. If there were, the food on those tables would taste better.
In order to understand the importance of pickled peppers, one must understand co-munching, which is the act of eating more than one item in the same mouthful. The items are munched together so that the various flavors converge and elevate one another. Co-munching is similar to adding a condiment to your meal, but unlike when a condiment is added, with co-munching the foods come together in the mouth, after bites are taken.
 The best items for co-munching are those that add flavor qualities like heat, acid and sweetness, all of which can be found in pickled peppers. Nibbling on a pickled pepper with your meal affords the opportunity for each mouthful to be properly doctored, balancing the meal’s fat with the pickled peppers’ acid, while adding the desired amount of heat or sweetness to the chewing experience. Once you get into the habit of co-munching with pickled peppers, you feel naked and bland without them. Pickled peppers can also be chopped and used as an ingredient, say, in tacos.
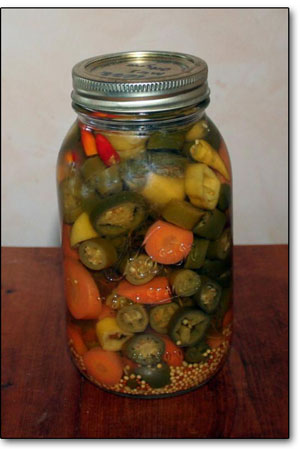
Many of the jars of pickled peppers I make include other vegetables as well, such as carrots, onions and cauliflower.
Carrots and cauliflower add earthy flavors to the mix, while absorbing piquancy from the peppers. Jalapeños, or other spicy, pungent peppers, go best with carrots and cauliflower.
Any type of pepper can be pickled, but fleshy varieties work best, be they hot, sweet, or both. Thin-skinned peppers, like cayenne, will contribute heat and flavor to the jar, but won’t absorb as much acid, and are less juicy.
One of my favorite pickled pepper combinations is one that I call “Hotties and Sweeties.” In this recipe, hot, fleshy red peppers, like Arledge or Louisiana peppers, are pickled with sweet peppers, like Klari Baby Cheese or Round of Hungary, without any other veggies. The only drawback to Hotties and Sweeties is that as soon as you crack the lid, the contents fly into the mouths of ravenous bystanders.
While I have certain go-to combinations, it’s best to be flexible enough to work with what’s available. Part of the beauty of pickled peppers is that, as with wine, each batch is different, depending on what’s available.
Like an aboriginal hunter utilizing every bit of his kill, I use the entire contents of my pickled pepper jar. Once a jar has been emptied of its goodies, the vinegar can be used in salad dressing, and the vinegar-soaked mustard seeds at the bottom of the jar can be ground in a blender, with turmeric and paprika, into homemade mustard.
What you do with your jar of peppers is only limited by your creativity and taste. But how you pickle them, while not exact science, does require some basic rules are followed, to ensure safety, flavor and texture.
Tools:
- Glass quart canning jars, wide or narrow mouthed, with appropriately sized rings and new lids.
- Rubberized tongs for grabbing the jars out of the boiling water.
- Large kettle
Materials:
- Peppers
- Mustard seeds (yellow, brown, or a mixture of both); 1 tablespoon per quart jar
- Vinegar (I use a mix of cider and white); 1½ cups per jar
- Salt, 1 teaspoon per quart jar
- Sugar , to taste
Optional:
- One grape leaf per jar, which somehow helps keep the peppers and other veggies crispy.
- Other veggies (carrots, cauliflower, onion, garlic)
Method:
If you’re unfamiliar with canning, or any of the terms that follow, read the directions that come with the mason jar lids.
Wash and sterilize the jars, lids and rings. Sterilizing jars is about the only thing I use the dishwasher for at home; it does a superb job on jars.
I prefer wide-mouth jars because they’re easier to pack. Begin by adding a teaspoon of salt and a tablespoon of mustard seeds to the bottom of each jar.
Larger peppers should be sliced into rounds; smaller ones can be left whole, but with the tops cut off next to the stem so as to allow the brine in. Cauliflower florets are broken into pack-able sizes; carrots are cut into whatever shape you like. For the carrot and jalapeño jars, I like to cut the carrots and peppers crosswise into half-inch discs. Onions can be sliced.
Pack peppers and veggies into jars as tightly and space-efficiently as possible, and leave a 1-inch “head space” between the veggies and the top of the jar. If possible, include a freshly picked and washed grape leaf, which helps keep your pickles crispy. But the most important factors in crispy pickles is to use fresh veggies, and to not overcook them.
When the jars are nearly packed, heat equal parts vinegar and water. As the brine heats, add sugar to taste, a little at a time until it softens the edge of the vinegar but doesn’t actually make it taste sweet.
Bring the brine to a boil, turn it off, and while it’s still piping hot pour it into the jars, covering the veggies by a half-inch and leaving at least a half-inch of head space. Wipe the rims of the jars, screw on the lids and rings, and with canning tongs, place the hot jars into a pot of boiling water, which must cover the jars by at least an inch. Boil for 5 minutes, remove, and let the jars cool to room temperature.
As you clean the kitchen, you’ll be serenaded by a concert of “ping”s, as the jars seal one by one. Wait a couple of weeks before cracking a jar. If the contents aren’t pickled enough, keep the jar in the fridge until they’re done.
Over the course of summer and fall, when the raw materials are abundant, I’ll pickle in spurts until I have about a hundred quarts. And another year’s worth of co-munching with pickled peppers begins.